Onigiri (Japanese Rice Balls) recipe
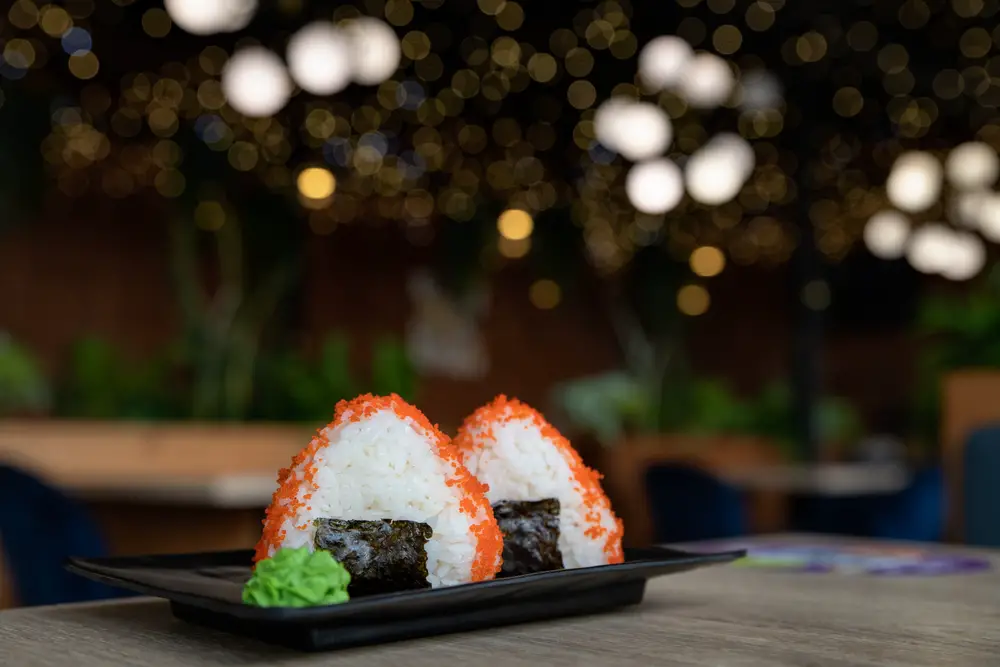
Onigiri, or Japanese rice balls, are a beloved staple of bento boxes, offering a versatile and satisfying snack or meal. These delightful treats are easy to customize with a variety of fillings, from savory grilled salmon to tangy pickled plums.
Crafted with tender, short-grain rice and wrapped in crispy nori, onigiri delivers a perfect balance of flavors and textures. Whether you enjoy them with bonito flakes or opt for other fillings like tuna with mayonnaise, the possibilities are endless.
Ideal for a quick lunch or a fun addition to any picnic, onigiri’s simplicity and adaptability make it a timeless favorite. Enjoy these rice balls as a delicious and convenient taste of Japan!

Onigiri (Japanese Rice Balls) Ingredients
Essential Ingredients for Perfect Onigiri
- Short-Grain White Rice: The foundation of every onigiri, this rice has a naturally sticky texture, making it ideal for shaping into cohesive rice balls that hold together beautifully.
- Nori (Dry Seaweed): Thin and crispy, nori wraps each onigiri with a subtle briny flavor, adding a delightful contrast to the tender rice.
- Bonito Flakes: These dried fish flakes provide a rich umami punch, infusing the filling with a savory depth that enhances the rice’s delicate taste.
- Sesame Seeds: A sprinkle of sesame seeds offers a nutty crunch, adding texture and a toasty aroma to every bite.
Recipe Tips
1. Mastering the Rice Texture
The key to perfect onigiri is achieving the right rice texture. Use short-grain white rice, as its stickiness helps the rice balls maintain their shape. Wash the rice thoroughly until the water runs clear to remove excess starch, which can make the rice gummy. After cooking, allow the rice to steam for 15 minutes with the lid on, then cool slightly before shaping. This ensures the rice has the right firmness and moisture balance, making it easier to mold into balls without falling apart.
2. Dampen Hands to Shape with Ease
Onigiri shaping can be tricky if the rice sticks to your hands. To prevent this, mix a small bowl of water with a pinch of salt and dip your hands in before handling the rice. This trick keeps the rice from sticking and lightly seasons the surface, giving the rice a better flavor. It also makes shaping each rice ball smoother and more precise, whether you prefer a classic triangle, round, or cylinder shape.
3. Experiment with Fillings
One of the joys of making onigiri is the freedom to customize fillings. While bonito flakes are traditional, consider trying options like grilled salmon, spicy tuna with mayonnaise, or even pickled plums for a tangy contrast. When adding fillings, create a small dimple in the rice before placing the filling, then cover and gently shape to avoid spillage. This ensures the filling remains at the center, delivering a burst of flavor with every bite.

What to Serve with Onigiri (Japanese Rice Balls)
1. Miso Soup
A warm bowl of miso soup pairs wonderfully with onigiri, offering a comforting balance of umami flavors. The light, savory broth, often enriched with tofu, seaweed, and green onions, complements the rice balls without overwhelming their delicate flavors. This classic combination is ideal for a complete, balanced meal.
2. Japanese Pickles (Tsukemono)
The crunchy, tangy taste of Japanese pickles, such as pickled radish (takuan) or cucumber, adds a refreshing contrast to the soft, savory onigiri. The sharp acidity of the pickles cleanses the palate, making them an excellent side dish to cut through the richness of fillings like tuna or bonito flakes.
3. Green Tea (Sencha)
For a simple and traditional beverage pairing, serve onigiri with a cup of hot or cold green tea. Sencha’s mild, grassy notes balance the heartiness of the rice, offering a cleansing finish. It’s a great way to keep the meal light, while enhancing the subtle flavors of the onigiri.
FAQ
1. Can I use different types of rice for onigiri?
It’s best to use short-grain white rice, as it has the right stickiness for forming onigiri. Medium-grain rice may work, but long-grain varieties like basmati or jasmine tend to be too dry and won’t hold their shape as well.
2. How do I store leftover onigiri?
To store leftover onigiri, wrap each rice ball tightly in plastic wrap and place it in an airtight container. Keep them in the refrigerator for up to 2 days. For a better texture, allow the onigiri to come to room temperature before eating, or reheat gently in the microwave.
3. Can I make onigiri ahead of time?
Yes, onigiri can be made a few hours ahead of time, making them great for picnics or bento boxes. However, it’s best to add the nori just before serving, as it can become soggy when wrapped in advance.
4. What is the best way to shape onigiri?
To shape onigiri, use damp, salted hands to avoid sticking. Place a portion of rice in your palm, gently press to form a dimple, add the filling, and cover with more rice. Shape the rice into a triangle or desired form with even pressure.

Onigiri (Japanese Rice Balls)
Ingredients
Method
- Rinse the rice in a fine mesh strainer until the water runs clear, eliminating excess starch. Combine the washed rice with 4 ½ cups of water in a large saucepan. Bring the mixture to a boil over high heat, stirring occasionally. Once boiling, lower the heat, cover, and allow the rice to simmer until the water is fully absorbed, about 15 to 20 minutes. Let the rice rest with the lid on for 15 minutes to finish steaming and achieve optimal tenderness. Cool the cooked rice before proceeding.
- Mix the remaining 1 cup of water with the salt in a small bowl. Use this salted water to lightly moisten your hands before handling the rice, preventing it from sticking. Divide the cooled rice into 8 equal portions. Each portion will form the base of an onigiri.
- For each onigiri, split a portion of rice into two. Create a small hollow in one half and place a generous teaspoon of bonito shavings inside. Cover the filling with the other half of the rice, pressing gently to enclose the filling securely within the rice ball. Shape the rice into a triangular form with gentle pressure, then wrap each onigiri with a strip of nori and sprinkle with sesame seeds. Repeat this process for the remaining rice portions.


