Crispy Chicken Thighs With Peppers, Capers and Olives
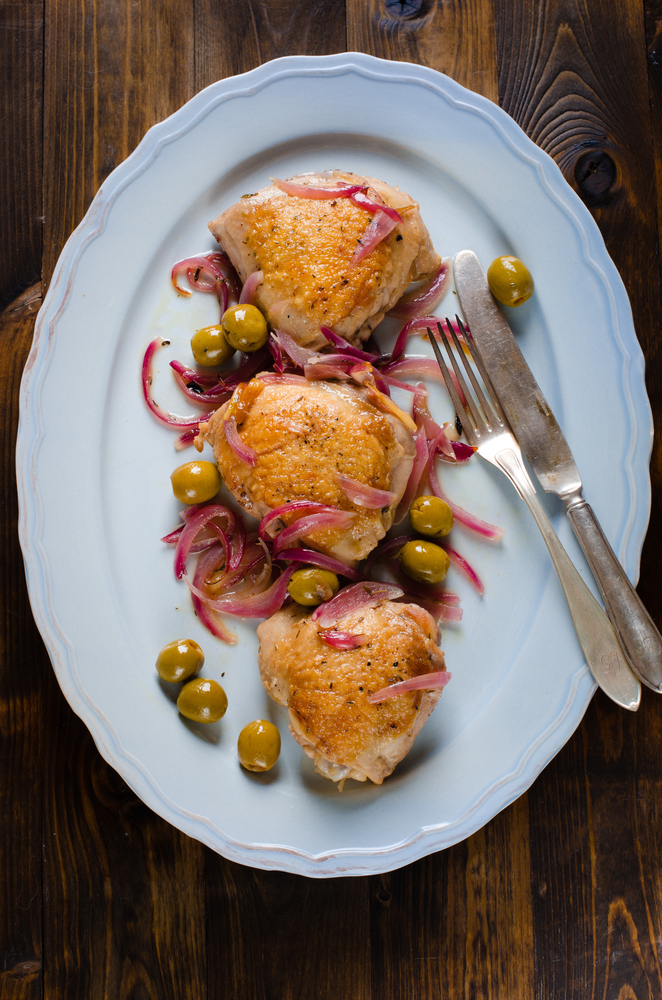
Crispy Chicken Thighs with Peppers, Capers, and Olives is a vibrant, flavor-packed dish that brings together juicy chicken thighs and a medley of colorful vegetables. The Italian technique of al mattone gives the chicken its irresistibly crisp skin while keeping the meat tender and juicy.
This recipe elevates classic chicken thighs by pairing them with bell peppers, onions, olives, capers, and a tangy splash of red wine vinegar. The combination of savory, briny, and tangy elements creates a perfect balance of flavors.
Whether served as a hearty weeknight dinner or a show-stopping meal for guests, this dish offers a deliciously satisfying bite in every forkful. The rich, bold flavors and satisfying textures make it a guaranteed favorite at the table.
Crispy Chicken Thighs With Peppers, Capers, and Olives – Ingredients
The star of this dish, bone-in, skin-on chicken thighs, offers rich, juicy meat and crispy skin, thanks to the Italian al mattone technique. Their natural flavor is enhanced by fragrant rosemary, garlic, and a hint of red-pepper flakes.
Sweet bell peppers and onions bring both vibrant color and tender texture, creating a savory base for the dish. The briny green and black olives, along with capers, infuse the peppers with a delightful tang, balancing the richness of the chicken.
Lemon zest and juice brighten the entire dish, adding a refreshing citrus note. The depth of extra-virgin olive oil ties the flavors together, while a touch of red wine vinegar and oregano adds a subtle acidity and earthiness to round out the dish.
Recipe Tips
- Marinate for Extra Flavor
Marinating the chicken for at least an hour allows the flavors of garlic, rosemary, and lemon to deeply infuse the meat, resulting in a more aromatic and flavorful dish. For even better results, marinate the chicken overnight in the refrigerator. This will give the spices more time to meld into the meat, making every bite even more savory. - Use the Right Pan for Crisp Skin
The key to achieving that golden, crispy chicken skin is using a heavy-bottomed skillet or a cast-iron pan. This ensures even heat distribution and prevents hot spots that could burn the skin. If you don’t have a cast-iron skillet, a thick stainless steel skillet can also work well. Just make sure the pan is preheated before adding the chicken. - Control the Heat for Perfect Chicken
When cooking the chicken, start with high heat to get a nice sear on the skin. Then, lower the heat to medium and place a weighted pan on top. This technique ensures that the chicken cooks evenly and crisps up without burning. Always check occasionally to avoid sticking, especially as the skin begins to brown.
What to Serve with Crispy Chicken Thighs with Peppers, Capers, and Olives
- Crispy Roasted Potatoes
The savory, crispy chicken and the bright, tangy peppers pair wonderfully with roasted potatoes. A side of golden, crispy roasted potatoes with rosemary and garlic will complement the dish’s rich flavors while providing a satisfying texture contrast. This combination makes for a well-rounded, hearty meal. - Mixed Green Salad
To balance the richness of the chicken and the stewed peppers, serve a light and refreshing mixed green salad. A blend of arugula, spinach, and fresh herbs, dressed with a simple lemon vinaigrette, will add a crisp, slightly bitter note that cuts through the dish’s richness, enhancing the overall experience. - Garlic Bread
Serve a warm loaf of crusty garlic bread alongside for dipping. The garlicky, buttery flavor of the bread complements the olives and capers in the peppers, while offering a perfect vehicle for soaking up the flavorful juices from the chicken and peppers. It’s a classic pairing that everyone will enjoy.
FAQ
- Can I use boneless chicken thighs instead of bone-in?
Yes, you can substitute boneless chicken thighs. However, cooking time will be reduced since boneless thighs cook faster than bone-in. Make sure to adjust the cooking time and check the internal temperature to ensure the chicken is fully cooked. - Can I use other vegetables instead of bell peppers?
While bell peppers are ideal for their sweetness and texture, you can substitute other vegetables like zucchini, eggplant, or even tomatoes. Just keep in mind that cooking times may vary depending on the vegetable’s water content and texture. - How do I store leftovers?
Leftovers can be stored in an airtight container in the refrigerator for up to 4 days. The peppers and olives will stay flavorful, and the chicken can be reheated in a skillet over low heat to retain its crispy skin. - Can I make this dish ahead of time?
You can prepare the peppers in advance and store them in the fridge for up to 3 days. The chicken can be marinated the night before for extra flavor. However, for the crispiest skin, it’s best to cook the chicken fresh before serving.

Crispy Chicken Thighs With Peppers, Capers and Olives
Ingredients
Method
- Step 1: Marinate the Chicken
- Begin by patting the chicken thighs dry and placing them in a large bowl. Season generously with kosher salt and freshly ground black pepper. Add the minced garlic, chopped rosemary, red-pepper flakes, lemon zest, and lemon juice. Drizzle with one tablespoon of olive oil and toss the thighs to coat evenly. Allow the chicken to marinate at room temperature for at least one hour, or for best results, refrigerate overnight.
- Step 2: Prepare the Peppers
- In a large skillet, heat two tablespoons of olive oil over medium-high heat. Once the oil shimmers, add the sliced onions and cook, stirring frequently, until they soften but do not brown. Next, add the bell peppers, stirring to combine. Season with salt and pepper, then add the grated garlic and red-pepper flakes. Reduce the heat to medium, partially covering the skillet with a lid, leaving a small gap. Allow the peppers and onions to cook for approximately 15 minutes, stirring occasionally, until fully softened.
- Step 3: Final Touches on the Peppers
- Add the green and black olives, red wine vinegar, and capers to the skillet, continuing to cook for a few minutes to allow the flavors to meld. Taste and adjust the seasoning as necessary, then sprinkle with dried oregano. Set the mixture aside to serve either warm or at room temperature.
- Step 4: Cook the Chicken
- Heat a large cast-iron skillet or heavy-bottomed pan over high heat. Add the remaining three tablespoons of olive oil. When the oil begins to shimmer, place the chicken thighs, skin-side down, into the pan. Gently shake the pan to ensure the chicken does not stick.
- Step 5: Crisp the Skin
- Reduce the heat to medium and cover the chicken with a piece of parchment or aluminum foil. Place another skillet on top of the chicken and weigh it down with a heavy object, such as a brick or canned goods. Lower the heat to low and cook for about 20 minutes, occasionally checking to ensure the chicken is not sticking. The skin should become beautifully browned and crisp during this time.
- Step 6: Cook the Chicken Through
- Flip the thighs over and cook for an additional 10 minutes, or until the chicken reaches an internal temperature of 165°F and the juices run clear. If desired, return the chicken to skin-side down and cook for a few more minutes to further crisp the skin.
- Step 7: Serve
- Place one chicken thigh on each plate, accompanied by a generous spoonful of the pepper, olive, and caper mixture. Leftover peppers can be stored in an airtight container in the refrigerator for up to one week.

